Table of Contents
The most time consuming part about training or fine tuning an object detection model are going to be data preparation, specifically drawing bounding boxes in images and labeling them correctly.
That’s why it’s common to use a smarter but slower model to help automate the image annotation process, then use them on training a smaller model.
Introduction to autoAnnoter
Github Repo: https://github.com/naseemap47/autoAnnoter
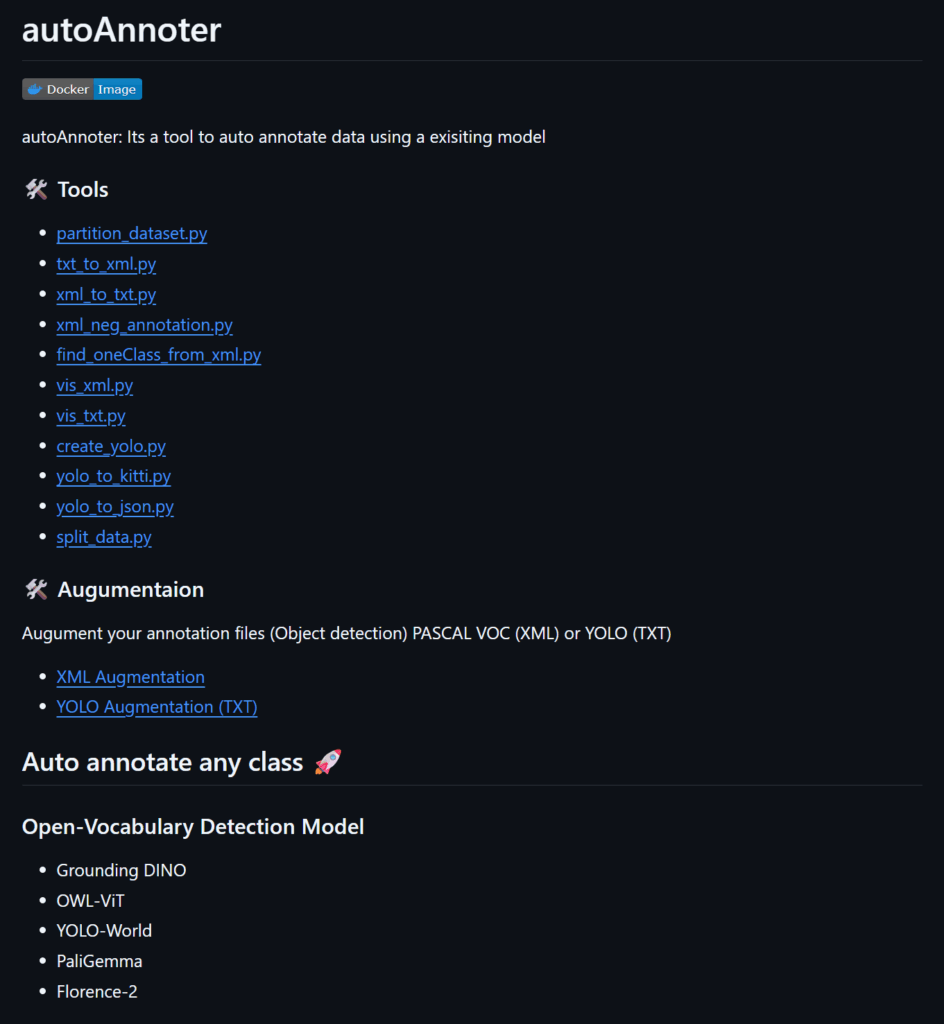
autoAnnoter is a nice collection of helper scripts that makes it easy to use various of model to create annotations for your datasets.
You can use the popular open vocabulary models like Grounding DINO or YOLO World, as well as state of the art object detection model like YOLOv8. (Works with YOLO11 too)
It also come with some helpful scripts that help you convert the annotations from the default txt to Pascal VOC format, which is useful because I can then import into CVAT for review.
While you can also use CVAT or Label Studio and setup a backend ML to get predictions, integration it is more troublesome and takes even more time, so for me this is much simpler and straightforward approach.
Easiest way to use autoAnnoter
The simplest way to start using it would be using docker container, the original repo did included a Dockerfile, but I wanted to use my Nvidia GPU on my PC so I made another Dockerfile using the Cuda image.
# Base image with CUDA 12.6 development tools and cuDNN
FROM nvidia/cuda:12.6.0-cudnn-devel-ubuntu22.04

# Set DEBIAN_FRONTEND to noninteractive to avoid prompts during apt-get
ENV DEBIAN_FRONTEND=noninteractive

# Install system dependencies required for Python, build tools, and runtime libraries
RUN apt-get update && \
    apt-get install -y --no-install-recommends \
    build-essential \
    python3.10 \
    python3.10-dev \
    python3-pip \
    git \
    wget \
    nano \
    libxml2-dev \
    libxslt1-dev \
    ninja-build \
    libgl1 \
    libglib2.0-0 && \
    ffmpeg \
    libsm6 \
    libxext6
    rm -rf /var/lib/apt/lists/*

# Make python3.10 the default 'python3' and 'python'
RUN update-alternatives --install /usr/bin/python3 python3 /usr/bin/python3.10 1 && \
    update-alternatives --set python3 /usr/bin/python3.10 && \
    # Also link python to python3 for convenience
    ln -sf /usr/bin/python3 /usr/bin/python

# Upgrade pip to the latest version
RUN python3 -m pip install --no-cache-dir --upgrade pip

# Install PyTorch 2.4.0 and TorchVision 0.19.0 compatible with CUDA 12.1
# (CUDA 12.1 wheels are forward-compatible with CUDA 12.6 runtime)
RUN python3 -m pip install --no-cache-dir \
    torch==2.4.0 \
    torchvision==0.19.0 \
    --index-url https://download.pytorch.org/whl/cu121

# Set the working directory in the container
WORKDIR /app

# Clone the autoAnnoter repository and checkout the specific commit
ARG AUTOANNOTER_REPO_URL=https://github.com/naseemap47/autoAnnoter.git
ARG AUTOANNOTER_COMMIT=d456f96abff8350f642c98e9b9b4a8ed22abce6c
RUN git clone ${AUTOANNOTER_REPO_URL} . && \
    git checkout ${AUTOANNOTER_COMMIT}


RUN pip install super-gradients
RUN pip install ultralytics lxml onnxruntime streamlit wget
RUN pip install transformers addict yapf timm supervision==0.6.0
RUN pip install -e GroundingDINO/
To use it just build the image with
docker build -t autoannoter-gpu .Then run the docker container with GPU and mount to your data directory
docker run --rm --name auto-label-images -it --gpus all --mount type=bind,src="C:\Users\Selfhosteverything\Desktop\images_for_label",dst=/content autoannoter-gpuThen you can start using, here’s an example to create annotations with Grounding DINO
python3 dino.py --prompt /content/prompt.json --dataset /content/images/(You can modify the dino.py yourself if you want to use the SwinB model instead of SwinT model)
Automate annotations with YOLOv8 – YOLO11

While the original repo did not mentioned YOLO11 but you can actually use the newer model too, the ultralytics package will handle getting the model.
python3 autoAnotYolo.py --dataset /content/images/ --model_type yolov8 --model yolo11x.pt --confidence 0.5 --keep 'person' 'car' 'dog' -n 3Or if you have a custom trained YOLO model you can also specify the path to the model, which is what I am doing too.
python3 autoAnotYolo.py --dataset /content/images/ --model_type yolov8 --model /content/yolo11x-custom.pt --confidence 0.5 --keep 'person' 'car' 'dog' -n 3The best model for auto annotations
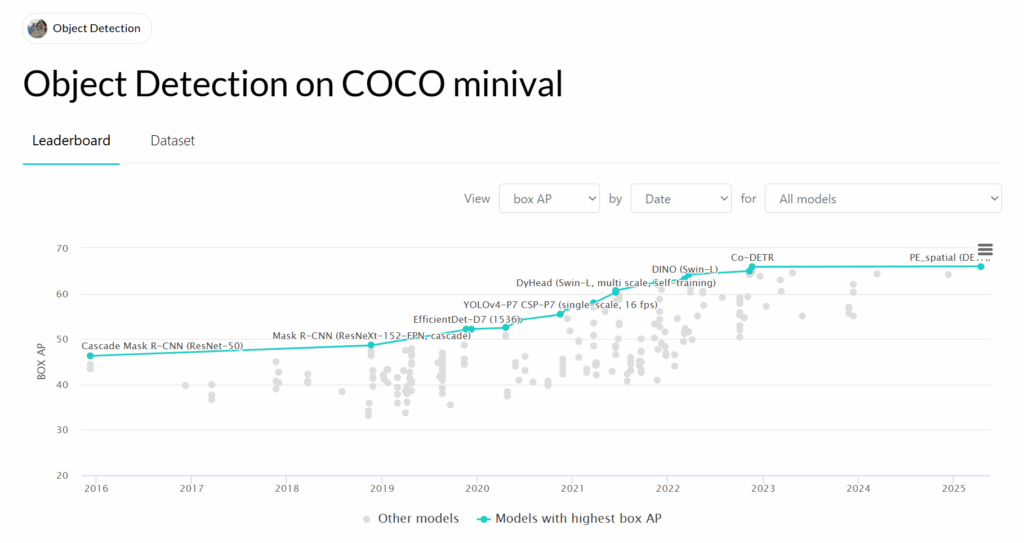
As a beginner into the world of object detection, computer vision and machine learning I thought I could just use the top ranking models with highest mAP on COCO validation, but to quickly found out these pretrained models may not work for your datasets.
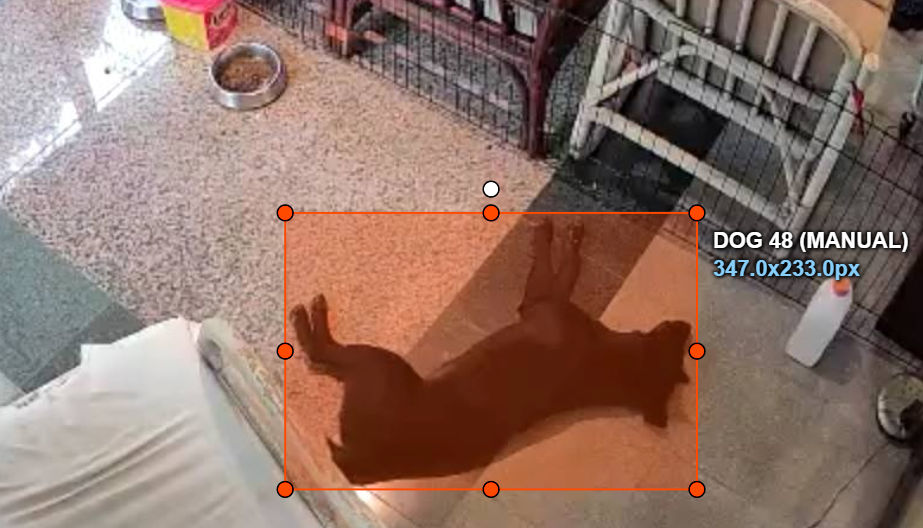
My datasets are low resolution frames from my security camera, with Grounding DINO and YOLO11, there are still many missed object or wrong object that I have to manually fix it.
The best model are probably going to be your fine tuned model, at the beginning I used Grounding DINO and some manual review to get few hundreds annotations, then I use them to train YOLO11n, and use then use the fine tuned YOLO11n to create more annotations, after multiple iterations I now have much better success from auto annotations which require lesser time to review.